Diablo 4’s Fields of Judgment is a compact yet highly rewarding mini-dungeon introduced with the Vessel of Hatred expansion. While it is home to Urivar, one of the game’s lower-tier LairBosses playerss should not underestimate the encounter, especially on higher Torment difficulties. With proper preparation, solid knowledge of the mechanics, and well-optimized Diablo 4 Items, Urivar is fully soloable by every class and extremely efficient to farm.
In this guide, we’ll cover where to find the Fields of Judgment, how to defeat Urivar, and a full breakdown of his loot table, including why this dungeon deserves a permanent spot in your endgame farming rotation.
Where to Find the Fields of Judgment in Diablo 4
The Fields of Judgment dungeon is located in the Teganze Plateau within the Nahantu region. While the area lacks major towns, players who have completed the Kichuk Stronghold in northeastern Nahantu gain access to a convenient nearby fast-travel point.
If Kichuk isn’t unlocked yet, you still have several ways to reach the dungeon:
·Fast travel to Caves of Kutokue
·Fast travel to Farai Cliffs
·Ride directly to the dungeon entrance
·Unlock direct fast travel after discovering the Fields of Judgment once
The dungeon itself is very short. Despite slight path randomization, it always funnels you quickly toward the Urivar encounter. This makes it an excellent choice for targeted farming runs where time efficiency matters.
Important requirements:
·You must own the Vessel of Hatred expansion
·You must be playing on Torment difficulty
Without meeting both conditions, the dungeon and Urivar will remain inaccessible.
How to Beat Urivar in Diablo 4
Urivar opens the fight by descending into the center of the arena and summoning knights around the perimeter. These knights throw fiery spears that leave burning trails and briefly apply poison damage. As a result, Fire Resistance is extremely valuable, particularly on Torment 3 and Torment 4.
Urivar’s Key Attacks
Urivar’s mechanics are clearly telegraphed but scale aggressively with difficulty:
·Rain of Spears that tracks player movement
·Charging sword attack that leaves three holy damage trails
·Holy beam tether that slows you while summoning incoming spears
On higher Torment tiers, these attacks can overlap and overwhelm even tanky builds. Mobility, positioning, and arena awareness are critical to survival.
Phase Changes and Damage Skips
At roughly 50% health, Urivar vanishes and forces players to defeat waves of summoned knights. However, this phase can often be skipped entirely with enough early burst damage.
Urivar does not become fully invulnerable; instead, he gains a shield. If you break this shield quickly, you can bypass entire phases of the fight. This is where optimized builds and high-end Diablo 4 Items truly shine, turning a multi-phase encounter into a brief burst window.
In the final phase, Urivar spawns Holy Circles on the ground that deal massive damage if touched. Once again, strong damage builds can skip this phase completely by burning him down early.
Group play trivializes the fight even further, making Fields of Judgment an excellent co-op farming dungeon.
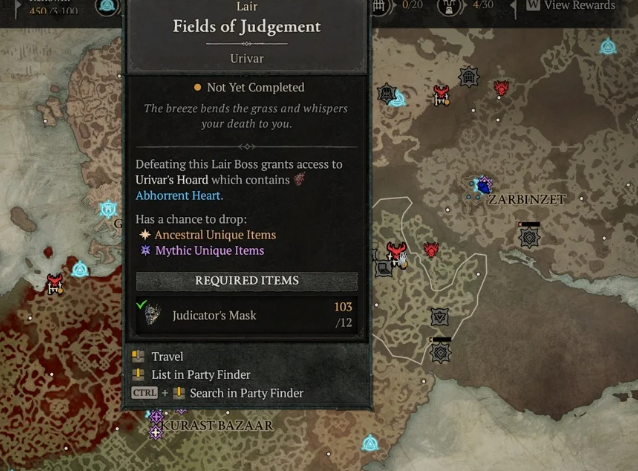
Loot Requirements: Judicator’s Masks
Defeating Urivar alone does not grant loot. To open his reward chest, you’ll need:
·12× Judicator’s Masks
These can be obtained from:
·Tree of Whispers caches
·World Bosses
·Mercenary Bartering
For players short on time, many choose to buy Diablo 4 materials to maintain uninterrupted farming loops, especially when chaining multiple Urivar runs in a single session.
Urivar Loot Table and Rewards
Urivar offers excellent rewards relative to his difficulty, making him an efficient target for both gearing alts and chasing specific Uniques.
Guaranteed Drops by Torment Level
·Torment 1: 3 Uniques, 1 Rune
·Torment 2: 4 Uniques, 1 Rune
·Torment 3: 5 Uniques, 1 Rune
·Torment 4: 7 Uniques, 1 Rune
Additional possible drops include:
·Stygian Stones (used to craft higher-tier boss materials)
·Abhorrent Hearts (required to summon the Harbinger of Hatred)
Group play provides bonus loot, further increasing efficiency for organized farming parties.
Mini Belial Encounter and Betrayer’s Husks
After opening Urivar’s chest, there is a chance for a Mini Belial encounter to spawn. This bonus fight drops additional loot and is currently the only source of Betrayer’s Husks, which are required to access the Belial Pinnacle Boss.
For players pushing pinnacle content or min-maxing their endgame builds, this alone makes Fields of Judgment worth repeated runs.
Final Thoughts: Is Fields of Judgment Worth Farming?
Absolutely. The Fields of Judgment delivers:
·Short, repeatable, clear times
·Predictable and manageable boss mechanics
·High Unique item density
·Reliable access to endgame summoning materials
Whether you’re upgrading gear, stockpiling crafting components, or preparing for pinnacle boss encounters, this dungeon fits neatly into any Torment-level farming route. With strong builds and properly optimized Diablo 4 Items, Urivar becomes less of a threat and more of a reliable lootsource, especially for players willing to buy Diablo 4 materials to keep the grind fast, consistent, and efficient.